
Japan Public Transport Fare System and Age CriteriaDistinction between adults and children, free travel range for infants, and key standards for Japanese transport fares.
Public transportation fares in Japan are strictly classified based on international age (western age). Child fares are generally 50% of adult fares, and fractions under 10 yen are usually rounded up.
1. Fare Classification by Age Group
- Adult (Age 12 and up): 100% of the standard fare.
- Child (Age 6 to under 12): 50% of the adult fare (e.g., Adult 150 yen → Child 80 yen).
- Toddler (Age 1 to under 6):
- Up to 2 toddlers are free per adult or child (on trains, subways, and local buses).
- However, a child fare applies if they occupy a separate seat on a Shinkansen or highway bus.
- Infant (Under 1 year): Always free.
2. Specifics of Elementary Student Fare Application
Criteria for child fares in Japan are influenced not only by birthdays but also by the Japanese academic year (starting in April). For travelers in 2026, please check the criteria below.
Exclusive TourCast Tips!
Should a 12-year-old elementary student pay adult fare?
In Japan, the school year changes every April 1st. Therefore, even if a child has turned 12, they are eligible for the child fare until they graduate from elementary school.
- Adult Fare: Children born on or before April 1, 2013, are considered middle school students starting April 2026 and must pay adult fare.
- Child Fare: Children born on or after April 2, 2013, can still receive child fare benefits until March 31, 2027, even if they are over 12.
In conclusion, elementary students born before April 1, 2014, can enjoy child fare benefits until March 31, 2027, based on the Japanese academic system.
This principle applies not only to trains and buses but also to admission tickets for major theme parks like Disneyland and USJ, so please verify the date of birth accurately when booking.
Complete Guide to Japan IC Transport CardsFrom card types to mobile issuance and refund tips.
Japanese IC transport cards (Suica, PASMO, ICOCA, etc.) are pre-paid rechargeable cards similar to those used in many major global cities. They are essential for Japan travel as they can be used for public transport and cashless payments at convenience stores, vending machines, and restaurants.
1. Major IC Card Types and Features
While various regions and railway companies issue different cards, they are now interoperable nationwide. Having just one allows you to use subways and buses across most of Japan.
| Card Name | Main Issuing Region/Company | Features |
|---|---|---|
| Suica / PASMO | Tokyo and Metropolitan Area (JR / Private Rail) | Highest versatility; can be registered in iPhone Wallet app. |
| ICOCA | Kansai (Osaka, Kyoto, etc. / JR West) | Essential for Kansai travelers; supports mobile registration. |
| SUGOCA / nimoca | Kyushu Area (Fukuoka, etc.) | Convenient for buses and trains in the Kyushu region. |
| Kitaca | Hokkaido Area (Sapporo, etc.) | Issued by JR Hokkaido. |
2. How to Purchase and Use
- Physical Cards: Can be purchased at ticket machines or counters at major stations. (Includes a 500 yen deposit.)
- Child Cards: Can only be purchased at station counters (with staff) by presenting a passport.
- Mobile Cards (iPhone): Suica, PASMO, and ICOCA can be issued instantly in the 'Wallet' app. Note that mobile issuance is not available for child cards.
- Payment: Simply say "IC ka-do de onegaishimasu" (IC card, please) and tap the card on the terminal.
3. Balance Inquiry and Charging
- Charging: You can charge with cash at station ticket machines, convenience store counters, or via bus drivers. Mobile cards can be charged instantly using a credit card registered in Apple Pay or Google Pay.
- Balance Inquiry: The balance is displayed on the screen when passing through ticket gates. You can also read the balance of a physical card using the 'IC Card Balance Check' feature in the TourCast app.
4. Refund Policy and Tips
The most important thing to remember is that refunds are only possible at stations within the region where the card was issued. (e.g., an ICOCA bought in Osaka cannot be refunded in Tokyo.)
- Refund Calculation:
Balance - Service Fee (220 yen) + Deposit (500 yen)- If the balance is less than 220 yen, the balance is surrendered and only the 500 yen deposit is returned.
- Therefore, it is most beneficial to use the balance as close to 0 yen as possible before requesting a refund.
- Mobile Cards: Refunds require a Japanese bank account, making it difficult for foreign travelers. It is recommended to spend the entire balance at convenience stores instead.
💡 TourCast Tip: Too much trouble to refund? Cards that are not refunded remain valid for 10 years from the last date of use, so you can use them on your next trip to Japan. Note that traveler-only cards (like Welcome Suica) have a short 28-day validity.
⚠️ Warning: Card Lock Issue When traveling long distances across different regions (e.g., taking a local train from Tokyo to Nagoya), crossing regional boundaries can cause errors at ticket gates and lock the card. In this case, you must go to a station attendant to settle the fare and unlock the card.
Exclusive TourCast Tips!
Precautions for Using IC Cards Across JR Sections
Because different railway operating companies (JR East, JR West, etc.) manage different regions in Japan,IC card usage is often limited to the jurisdictional area of the issuing company. In short, IC card compatibility usually aligns with the specific JR company's coverage area.
Practical Examples:
- Permitted: Traveling from Osaka Station to Kyoto Station on a JR train. Both are under JR West (JR-WEST), so there are no issues tapping in and out.
- Not Permitted: Traveling from Kyoto Station (JR West) to Nagoya Station (JR Central) using only an IC card. IC cards cannot be used for long-distance travel crossing company boundaries.
How to Resolve Issues:
- Recommended Method: For long-distance travel crossing boundaries, purchase a paper section ticket to your destination at a ticket machine before boarding.
- If you accidentally board with an IC card: You must pay the full fare in cash at the destination station's adjustment office. The card will enter a Locked state because it lacks an exit record, and technically it must be unlocked at a station within the original company's jurisdiction, which is very inconvenient.
💡 TourCast Tip: When moving significantly between regions using Shinkansen or Limited Express trains, it is standard practice to use dedicated tickets rather than IC cards. Be especially careful when passing boundary stations (e.g., Atami, Maibara).
Master Guide to Japanese TrainsFrom Shinkansen to local trains, understand seat, class, and fare differences at a glance.
Trains are the most vital mode of transport for traveling in Japan. Because there are many types of trains and complex seating and fare systems, it is important to understand the classes and types clearly before use.
1. Seat Classes and Categories
Seat classes vary by train type, and reservation methods and usage rules differ.
- Non-reserved Seat (自由席): Seats are not assigned; you can sit freely in any available seat within the designated non-reserved cars.
- Reserved Seat (指定席): A specific train and seat number are assigned.
- Green Car (グリーン車): A superior class (similar to First Class) with wider and more comfortable seats than standard reserved seats.
- Gran Class (グランクラス): The highest class of seating available only on certain Shinkansen, providing aircraft First Class-level service.
💡 Usage Tip: If you miss the train you booked for a reserved seat, you can board the 'Non-reserved' section of a same-grade train on the same day. If you wish to sit in a reserved seat again, you must repurchase a reserved seat ticket.
2. Classification and Usage by Train Grade
Japanese trains are broadly classified into three types: Shinkansen, Limited Express, and Local Trains.
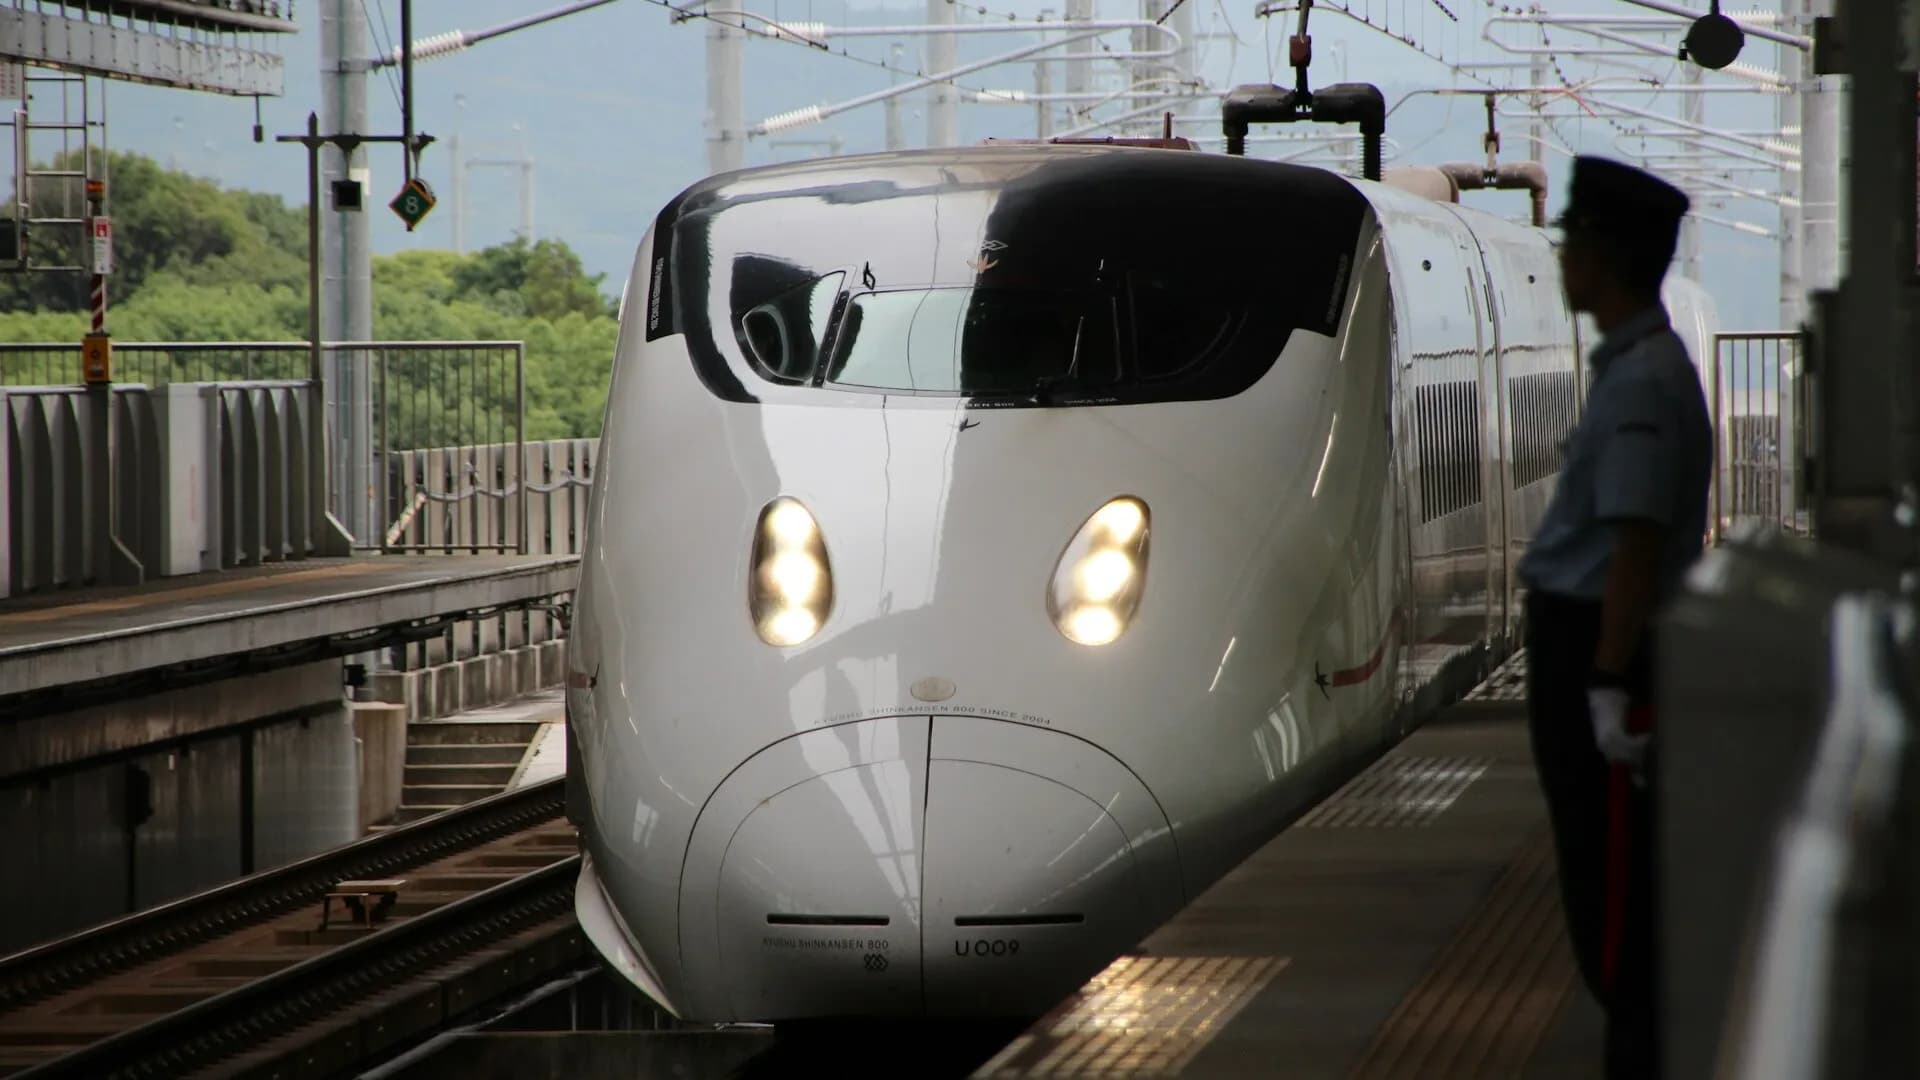
1) Shinkansen (新幹線) 🚄
Japan's iconic high-speed trains. Grades are divided into names like Nozomi, Hikari, and Kodama depending on the line.
- Fares: Requires both a
Basic Fare Ticket+ aLimited Express Ticket (Non-reserved/Reserved). - Payment Method: Boarding is not possible with an IC card alone; you must purchase a dedicated ticket.
- Large Luggage Rule: For luggage with dimensions totaling over 160cm, you must book a 'Seat with an Oversized Baggage Area' in advance. Bringing such luggage without a reservation results in a 1,000 yen fee. Precautions for Oversized Baggage on Shinkansen
💡 Secret of Shinkansen Design: The sharp nose of the Shinkansen is designed to reduce noise (sonic boom) when entering tunnels. Inspired by the kingfisher's beak, this design allows for quiet operation even at high speeds.
2) Limited Express (特급) 🚆
Superior trains that quickly connect major cities, such as the Narita Express or Haruka.
- Seat Features: Seats are forward-facing, and there is dedicated luggage storage space.
- Usage Tip: Requires a separate 'Limited Express Ticket' in addition to a basic fare ticket (or IC card). For example, after passing the gate with an IC card, you sit in the seat number specified on your separately purchased Limited Express ticket.
3) Local Trains (普通·急行) 🚋
This includes subways and standard trains, which can be used with just a basic ticket or IC card without extra fees.
- Local (普通): Stops at every station.
- Express/Rapid (急行/快速): The fare is the same as a local train, but it stops only at major stations to reach the destination faster.
- Note that 'Tokkyu' (Express) grades on local/private lines often do not require extra fees, so do not confuse them with 'Limited Express' trains.
3. Operators and Ticket Issuance
| Category | Operator and Features |
|---|---|
| JR Lines | Companies based on the national railway forming a nationwide network (6 regional companies like JR East, JR West). |
| Subway | Urban railways operating mainly in underground sections within major cities like Tokyo Metro or Osaka Metro. |
| Private Rail | Above-ground lines operated by private corporations like Nankai, Hankyu, or Kintetsu (some have their own Limited Express trains). |
Ticket Issuance Forms
- Basic Fare Ticket + Limited Express Ticket: When using Shinkansen or Limited Express, these may be issued as two separate tickets or combined into one. Often, both tickets must be inserted into the ticket gate together.
- Using JR Pass: Insert only the main pass into the ticket gate. If you have reserved a seat, carry the 'Reserved Seat Ticket' with you when boarding.
4. Etiquette Regarding Seat Classes
The most important thing to remember when using Japanese railways is that seat classes are strictly enforced.
- Reserved vs. Non-reserved: Sitting in a reserved seat car with a non-reserved ticket is forbidden. Even if there are many empty seats in a reserved car, you must stay in the car class specified on your ticket.
- Avoid Fare Evasion: If you accidentally board a different class, inform the conductor immediately and pay the difference. Sitting in a superior class without official procedures can lead to misunderstandings.
💡 Tip: Current Trend - All Seats Reserved
Recently, many Japanese Limited Express trains have abolished non-reserved cars and operate as 'All Seats Reserved.' Policies for full trains vary.
- Non-reservable Trains: Some trains (e.g., Yufuin no Mori) will not accept more passengers once reserved seats are full.
- Trains with Unassigned Seat Tickets: Some trains sell 'Unassigned Seat Tickets' even when reserved seats are full.
- You may sit in an empty reserved seat, but you must vacate it if a passenger with a reservation arrives.
- If no seats are empty, you must generally stand in areas like the aisles.
⚠️ Warning on Contactless Cards: While there is information about using contactless credit cards for transport, as of 2026, this is limited to specific areas like certain lines in Fukuoka and Osaka. It is not accepted on all lines, including Tokyo JR, so it is better to have an IC transport card as well.
Basic Ticket and Limited Express Ticket: Do You Need Both?Understanding Japan's dual ticket system and special district rules.
When using Shinkansen or Limited Express trains in Japan, you need both a Basic Fare Ticket and a Limited Express Ticket (for seat and speed fees). Understanding the role of these two tickets is necessary to prevent extra charges or gate errors.
1. Basic Fare Ticket vs. Limited Express Ticket: What's the Difference?
- Basic Fare Ticket: A ticket for the base fare to move from Station A to Station B. It specifies the distance and validity period.
- Limited Express Ticket: An additional fee ticket for riding a Shinkansen or Limited Express train. It lists the train name, time, and seat number.
2. Precautions for Basic Fare Tickets
- Validity Period: Can be valid for 2 or more days depending on the distance (approx. 1 additional day per 100km).
- Stopovers: Tickets for distances over 100km allow you to exit and re-enter at stations along the route. (Not allowed for Limited Express tickets.)
- Kasha Zento Muko (下車前途無効): If your ticket has this phrase, it becomes invalid for the remaining distance once you exit the ticket gate.
3. JR Exceptions: Secrets of 'Tokyo Ward Area' and 'Osaka City Area'
If your ticket lists '東京都区内' (Tokyo Ward Area) or '大阪市内' (Osaka City Area) instead of a specific station, it means a special exception system applies, allowing you to use all JR stations within that area at no extra cost.
Exclusive TourCast Tips!
Prevent IC Card Errors! How to Use Tickets Properly
If a Shinkansen ticket has the symbol 区 (Tokyo Ward Area) or 阪 (Osaka City Area), you can transfer to JR local trains for free within that city.
[Image showing special symbols on tickets]Usage Tips by Situation:
- Example (Osaka → Tokyo): If taking a local JR train from Osaka Station to Shin-Osaka Station to catch the Shinkansen, insert your Shinkansen Basic Fare Ticket at the Osaka Station gate. (No IC card needed.)
- Example (Mixing with IC Card): When starting from a station outside the special zone (e.g., Yao Station) and passing through the transfer gate at Shin-Osaka, insert the paper ticket first, then tap your IC card. If you only insert the paper ticket, your IC card won't have an 'exit' record and will malfunction later.
Major District Symbols:
💡 Tip: Fare Adjustment If you traveled further than your destination or have insufficient funds, use the 'Fare Adjustment' machine near the gates or show your ticket/card to an attendant to pay the difference before exiting.
⚠️ Warning: Limited Express Ticket Validity Unlike basic fare tickets, a Limited Express ticket's validity expires the moment you exit the designated train. If you get off mid-route to sightsee and then want to board another Shinkansen, you must buy a new Limited Express ticket.
How to Navigate Japanese Subways Without Getting LostSmart travel using platform numbers and exit information from Google Maps.
Japanese train stations are famously complex, but understanding Google Maps' route guidance can help you navigate even for the first time.
1. Check Platform Numbers
If the destination names on station signs are unfamiliar, focus only on the platform number provided by Google Maps.
- Finding the Number: The 'Platform Number' is displayed in the Google Maps route details. Once inside the station, simply follow the numbered overhead signs to reach the correct boarding location.
- Meaning of Platform 3/4: If the platform number is listed as 3/4, it means an island platform where trains arrive on both sides. In this case, check the train's direction on the electronic display board before boarding.
2. Exit Numbers and Fastest Carriage Info
In large stations, taking the wrong exit can result in a 10-minute walk.
- Yellow-backed Symbols: Symbols like E2 or Exit 14 shown in Google Maps refer to specific entrance/exit numbers.
- Optimal Carriage Info: Google Maps also provides the carriage number (e.g., Car 4) closest to the exit, making transfers or exits much faster if you board that specific car.
3. Tip When Exit Info Isn't Visible
- Destination Setting: Searching for just a station name (e.g., Shibuya Station) often omits exit numbers.
- Enter Specific Facility Names: Searching for a final destination like 'Shibuya Sky' or a 'Department Store Name' will provide the exit number closest to that specific location.
💡 TourCast Tip: Reading Station Displays Station displays in Japan often include English, but if they don't, check for 'Local' or 'Express' indicators first. Compare the list of stops in Google Maps with the train's grade to ensure it stops at your intended station.
Staying on the Train? The Secret of Through-ServiceUnderstanding Japan's convenient 'Direct Operation' system to reach your destination without transfers.
When using Google Maps or route search apps, you may see the instruction “Stay on train.” This refers to a unique Japanese rail operation known as 'Through-Service' (直通運転, Chokutsu Unten).
1. What is Through-Service?
It is a system where different railway companies connect their tracks to operate trains jointly. For passengers, it is very convenient as they can reach their destination in one go without needing to get off or transfer at intermediate stations.
- Features: The train stops at the boundary station (where the operator changes), but it departs again after a brief announcement (the driver and crew often change here).
- Representative Example: Tokyo Metro Fukutoshin Line ↔ Tokyu Toyoko Line ↔ Minatomirai Line (allowing a direct trip from central Tokyo to Yokohama).
2. Fare Adjustment for Through-Service
Even if you don't get off the train, fares for the two or more companies used are combined.
| Payment Method | Settlement Method |
|---|---|
| Cash (Ticket) | Purchase a ticket for the combined total fare to your destination at the starting station's ticket machine. |
| IC Card | When you tap at the destination exit gate, the fares for each company are automatically calculated and deducted. This is the easiest method. |
| Transport Pass | If you go beyond the pass's coverage area, show your pass to an attendant at the exit station and pay the difference for the uncovered section in cash or with an IC card. |
💡 TourCast Tip: Caution for Pass Users You might start your journey within your pass's area (e.g., Tokyo Subway Ticket) but end up outside that area due to a through-service train. In this case, inserting the pass into an automated gate will cause an error. Go to the manned counter (manned gate) to present your pass and settle the additional fare.
⚠️ Warning: Confirm Express/Rapid Some through-service trains are Express or Rapid trains that skip certain stations. If you are getting off at a small station, verify in Google Maps that the train grade actually stops there.
How to Use Japanese Buses and Boarding RulesEverything about using Japanese buses, from boarding positions to numbered tickets and payment methods.
Japanese bus boarding positions and payment methods vary by region or line. This is often the most confusing part for first-timers, so it is good to learn in advance.
1. Distinguishing Boarding Methods by Region
The first thing to check is which door to use for boarding and exiting. Usually, '入口' (Entrance) and '出口' (Exit) are marked on the side of the bus.
- Board via Back Door → Exit via Front Door (Distance-based fare): Common in many regions like Kyoto or Fukuoka. You pay the fare based on distance traveled when exiting.
- Board via Front Door → Exit via Back Door (Flat fare): Mainly seen in city centers like Tokyo's 23 wards. You pay the fare when boarding.
2. Numbered Tickets (Seiriken) and Fare Verification
If paying with cash, you must understand the 'numbered ticket' system.
- Boarding: When boarding via the back door, take a small paper ticket (Seiriken) from the machine. (If using an IC card, just tap.)
- During Ride: An electronic display at the front of the bus shows real-time fares corresponding to your ticket number.
- Exiting: When your stop is announced, press the stop button. Put the fare amount and the ticket into the fare box next to the driver.
3. Precautions for Fare Payment
- Change: Japanese bus fare boxes do not automatically give change. You must first use the exchange machine (両替, Ryogae) to break bills/coins and then put the exact amount into the fare box.
- Bill Exchange: Exchange machines usually only accept 1,000 yen bills. They cannot break 5,000 or 10,000 yen bills, so prepare small change in advance.
- IC Cards: Tap your IC card both when boarding and exiting; the optimal fare is calculated automatically.
💡 TourCast Tip: Paying for Multiple People If you want to pay for multiple people with one IC card, tell the driver "Otona futari" (Two adults) before tapping for exit. The driver will adjust the terminal, and then you can tap to deduct the amount for the specified number of people.
⚠️ Warning: Safety - Move Only After Stopping In Japan, it is considered very dangerous to stand up and move while the bus is in motion. Wait until the bus comes to a complete stop before heading to the exit; the driver will wait for you.
4. Summary of Stop Buttons and Settlement
- Flat Fare Lines: Since the fare is the same regardless of distance, you pay once when boarding.
- Distance Fare Lines: The numbered ticket proves your boarding location, so do not lose it. (If lost, you may be charged the maximum fare from the starting point.)
Japanese Taxi Usage GuideFrom automatic door precautions to fare inquiries and a comparison of useful hailing apps.
In Japan, it is common to return home before public transport stops. This is partly due to the high cost of taxis compared to other modes of transport. However, they can be a strategic choice for groups or heavy luggage.
1. Essential Basic Information
- Fare Levels: A 2–3km ride usually costs around 1,200–1,300 yen. Late-night surcharges (usually 22:00–05:00) add about 20%.
- Passenger Capacity: Standard taxis accommodate up to 4 adults. While 3 children under 12 may be counted as 2 adults, it is best to check the vehicle size for safety.
- Seat Belts: Wearing seat belts in all seats, including the back, is mandatory in Japan.
⚠️ Warning: Automatic Back Doors The most distinct feature of Japanese taxis is that the back doors open and close automatically. You must wait for the door to open.
Do not try to force the door open or closed by hand, as this can cause a malfunction and distress the driver.
2. Taxi Hailing and Fare Search Apps
If it is difficult to catch a taxi on the street, use these apps. Most allow you to enter your destination in advance, reducing language barriers.
| App | Features and Pros/Cons |
|---|---|
| Uber | Offers the most discounts and promotions. You can register local coupons for cheaper rides and use referral codes within your group. |
| GO | The #1 app by market share in Japan; taxis are found the fastest. If your phone language is not Japanese, it usually defaults to an English UI. |
| DiDi | Integrates well with Google Maps. Supports an English UI, making it convenient for foreign travelers. |
3. Useful Travel Tips
- Fare Preview: When searching for routes in Travel Tools - Taxi Fare Calculator, the estimated fare is displayed. This is very useful for estimating your budget.
- Lost Item Prevention: Drivers record logs alongside issuing receipts. If you leave an item behind, the vehicle number or company contact info on the receipt is the key to tracking it down, so always take your receipt.
💡 TourCast Tip: Payment Etiquette While most taxis now accept credit cards and IC transport cards, some rural or independent taxis may still only accept cash. Before boarding, check the card logo stickers on the door or ask "Ka-do dekimasu ka?" (Do you accept cards?).